 Craft: Sienar Fleet Systems TIE/sa Bomber
Type: Dedicated light space bomber
Scale: Starfighter
Length: 7.8 meters
Width: 9.3 meters
Height/depth: 5.1 meters
Skill: Starfighter piloting: TIE Bomber
Crew: 1
Passengers: 6 (passenger pod configuration)
Crew Skill: Missile weapons 4D+1, starfighter piloting 4D, starship gunnery 5D
Cargo Capacity: 15 metric tons (bomb bay)
Consumables: 2 days
Cost: 150,000 (new), 60,000 (used)
Space: 6
Atmosphere: 295; 850 kmh
Hull: 4D+1
Sensors:
Passive: 20/0D
Scan: 35/1D
Search: 50/2D
Focus: 3/2D+2
Weapons:
2 Laser Cannons (fire-linked)
Fire Arc: Front
Skill: Starship gunnery
Fire Control: 2D
Space Range: 1-3/12/25
Atmosphere Range: 100-300/1.2/2.5 km
Damage: 4D
Concussion Missiles (16 carried)
Fire Arc: Front
Skill: Missile weapons: concussion missiles
Fire Control: 3D+2
Space Range: 1/3/7
Atmosphere Range: 50-5O0/1/5 km
Damage:9D
Components
Weapons: {replaces either of the above energy weapons}
Standard Sienar L-s1 Laser Cannon: The default laser cannon on the TIE Bomber is used primarily in dogfights. It is a well balanced weapon most suitable in turning fights against enemy starfighters. {as above}
Krupx JR-89 Ion Cannon: Ion cannons aren't often used on the TIE Bomber. They can be used to target a capital ship's shields to make it easier to attack. {Damage: 3D Ion Damage}
Sienar Guided Rotary Cannon: The guided rotary cannon is rarely used on account of its reduced damage. While the auto-aim helps against mobile targets, your craft will have trouble turning while the cannon is firing. {Fire Control: +2D, Manueverability: -1D}
Sienar Rotary Cannon: The rotary cannon is most often seen used by players who enjoy head-on attacks against enemy fighters, or by players in a dedicated anti-capital ship role. The rotary cannon sharply reduces your turning ability while firing, limiting its effectiveness in turning fights. {Fire Control: +1D, Manueverability: -1D< Damage: +1D}
Countermeasures: {Elite Pilots can choose to equip their fighter with one of the below}
Sienar XX-5 Seeker Warheads: Seeker Warheads, or sometimes called "flares", are the most common and flexible anti-missile countermeasure. A-wings are often found turning and manoeuvring, making chaff less useful, and the sensor jammer only has a single use. {When used reduces enemy skill to attack the fighter with Missiles by 3D}
Chaff Particles: Chaff particles are not often used on the A-wing, as in order for it to reach maximum effectiveness, enemy missiles must fly through the static cloud. This cloud can be used to cover capital ships on occasion, but flares are the more popular choice. {When used creates a cloud behind the fighter which reduces all skill with missiles by 3D, but only for weapons fires through the cloud}
Sienar Sensor Jammer: The sensor jammer's short 4 second duration and single use make it not often used. Its biggest benefit is being able to shake missiles at any rate and from any direction. {A single use system, which stops any missile from hitting the fighter}
Auxiliary: {replaces the above Projectile Launcher with two (left and right) Auxiliary systems}
Sienar KB-D28 Proton Torpedo: Proton torpedoes cause up to four times the damage of a regular concussion missile. They are ineffective against shielding, but pack a wallop when they hit. Deploy them carefully against corvettes, which can outrun the torpedo. Combine with an ion torpedo strike from a fighter or support for best effect. Stay at maximum range when you launch the torpedo and reduce speed so you don't get too close when you launch it. {same stats as above except Ammo: 8}
Sienar MR-93 Multi-Lock Missile: Not to be confused with the cluster missile, the multi-missile locks onto multiple targets and fires a missile at each one. Lock onto as many targets as possible before firing. It is best used to farm enemy AI ships on defence, shrinking the enemy's window of opportunity to destroy your capital ships. {Skill: Starship gunnery; Concussion Missile, Fire Control: 3D, Damage:7D, Ammo: 8, Missiles may be targeted when targets are out of range, and then multiple missiles fired when within range.}
Sienar Goliath Missile: This variant of the normal concussion missile is identical in most respects to its fighter counterpart. Unique to the Goliath missile is that it explodes in a huge area of effect, destroying entire AI squadrons and causing considerable damage even if decoyed by flares or chaff.. {Skill: Starship gunnery: Goliath Missile, Fire Control: 2D, Damage: 8D,7D,6D, Blast Radius:1/2/3, Ammo: 4 Missiles}
Sienar HC-7 Ion Bomb: Ion bombs cause extra damage to shielding and can disable subsystems, but do not cause raw damage. Follow up attacks will be required to damage the targets. {Skill: Starship Gunnery: Ion Bomb, Scale: Capital, Fire Control: 0D, Space Range: 1/3/7, Atmospheric Range: 50-100/300/700m, Damage: 8D Ion Damage, Rate of Fire: 1, Ammo: 4 Bombs}
Sienar KW-84 Proton Bomb: Proton bombs cause considerable damage to targets. {Skill: Starship Gunnery: Proton Bomb, Fire Control: 0D, Space Range: 1/2/4, Atmospheric Range: 50-100/200/400m, Damage: 10D, Ammo 4 Bombs}
Sienar Seeker Mine: Drops a mine behind you. The mine locks onto and chases any enemy that gets too close. Mines are most effective in narrow corridors where enemies will have to run near them.. {Skill: Starship Gunnery: Seeker Mine, Fire Control: 5D (does not use pilots skill), Space Range: 3, Atmospheric Range: 300m, Damage: 6D, Ammo: 5 mines, mine is dropped behind the fighter, where it follows for up to 1 minutes until another vessel enters it's range, upon which it attacks using only it's Fire Control}
Sienar RD-77 Assault Shield: The Assault Shield, when activated, puts up a shield in front of you that blocks a large percentage of damage. It only lasts 3 seconds and sharply reduces your turning ability when active. It is best used therefore in head-on attacks against enemy players, or as additional protection when attacking an enemy capital ship. {a Single Use Force Shield, which provides adds 4D to shields for 1 round}
Quarrie Composite Beam Cannon: The composite beam cannon, is a powerful anti-capital ship weapon. While you can't alter your course with the beam active, it is more than capable of drilling through shields and hull to deal considerable damage - especially against enemy subsystems. {Scale: Capital, Space: 1-5/15/32, Atmosphere Range: 100-500/1.5/3.2km, Fire Control: 3D, Damage: 4D, Cannot Dodge attacks, Requires a 5 round cool down before using again}
Sienar Boost Extension Kit: When triggered, this component gives you a full boost charge. Utilize this component to aid in advanced drifting techniques, allowing you to maintain offence and mobility simultaneously. {Requiring a 3 round cool down, this unit increases speed by +3, and Manoeuvrability by +2D}
Sienar Prototype Piercing Torpedo:Piercing Torpedoes are used exclusively against flagship subsystems. While they cause minimal damage to the hull of the target flagship, they are unique in their ability to ignore shielding. They are most often used against shield generators to allow for easier subsequent attacks. {Skill: Starship Gunnery: Piercing Torpedo, Fire Control: 0D, Scale: Capital, Space Range: 1/3/7, Atmospheric Range: 50-100/300/700m, Damage: 3D (ignores shields), Rate of Fire: 1, Ammo: 8 Torpedos}
Hull: {One of the below may be selected for specific missions}
Sienar Ferroceramic Hull: The standard hull, with no strengths or weaknesses. {as above}
Sienar Dampener Hull: The Dampener hull increases the amount of time an enemy needs to lock onto you with missiles. This benefit comes with a reduction in health, so it isn't often used since TIE Bombers are generally fairly easy to lock onto anyway.. {-1D to enemy Fire Control for Missiles, -1D Hull}
Sienar Reinforced Hull: This hull increases your ship's hull at the expense of mobility. This makes it perfect for dedicated bombers, looking to fly with the extra health required to reach their targets. {+2D to Hull, -1D Manoeuvrability, -2 Speed}
Sienar Agile Hull: This hull option decreases your ship's hull but increases mobility. On the TIE Bomber, this effectively turns you into a TIE Fighter variant, with slightly more health and approximately the same mobility, but less acceleration {-1D to Hull, +2D to Manoeuvrability}
Engines: {One of the below may be selected for specific missions}
Twin Ion Engine: The standard sublight engine with no benefits or drawbacks. {as above}
Unstable Twin Engine: This engine makes you lose a moderate amount of both health, but offers greatly increased acceleration and speed. What really makes this engine stand out, however, is the large explosion you create when you are shot down. Some players use this explosion as an anti-capital ship weapon, hoping to take out the capital ship's turrets when they die. {-1D Hull, +2 Speed, +1D Manoeuvrability, 7D Explosion when destroyed}
Twin Jet Engine: This engine greatly increases the rate at which you generate boost power, but also greatly increases the rate at which you consume it. This engine is mostly designed for drifting, as it performs very poorly when boosting in straight lines. {Requiring a 3 round cool down, this engine can provide a boost, increasing speed by +2, and Manoeuvrability by +1D}
Twin SLAM Engine: The SLAM (Sublight Acceleration Motor) engine automatically produces boost power regardless of whether there is maximum power in the engines or not, at the cost of maximum speed. It is similar to the Jet Engine, in that it provides smaller boosting power but lets you boost more often. The SLAM engine reduces your overall speed, but lets you divert power from engines to other systems and receive a small trickle of boost power. Increasing power to engines will appropriately increase the boost meter respectively. {This diverts power to the other systems of the Tie Bomber +2D damage to the Energy Weapons, at the expense of -2 Speed and -1D Manoeuvrability}
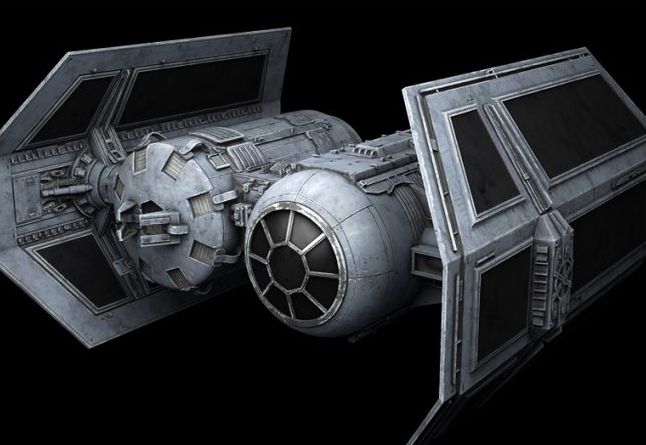
Description: Slower than the standard TIE fighter, the TIE bomber boasts increased armor, an impressive explosives arsenal, and heavy blasters ideal for assaulting large targets.
Bombers are flexible craft with extremely powerful guns. What they lack in mobility, they make up for in firepower, against both fighters and capital ships. Being equipped with both bombs and proton torpedoes for capital ships is half of their battle - they also feature the powerful rotary cannon. They also use the Goliath and Multi-Target Missile to quickly destroy AI fighters in fleet battles, reducing the enemy's window of opportunity to target friendly capital ships.
The TIE/sa bomber, formally known as the TIE Surface Assault Bomber and also known as the TIE/sa tactical bomber and TIE bomber, was a bombing variant of the TIE line used by the Galactic Empire, and was their main source of anti-emplacement air-support. They were nicknamed "dupes" by the New Republic pilot Wyl Lark.
The TIE/sa bomber was specifically designed by Sienar Fleet Systems for use in the military of the Galactic Empire. A model of light bomber, it was part of the TIE line of starfighters, distinguished by their twin ion engines and solar collector panels. The bomber measured 7.9 meters long, 10.6 meters wide, and 5.4 meters high. In keeping with the Empire's preference for muted colors, it was painted a bluish gray.
Like the TIE Advanced x1 prototype, the TIE/sa bomber had inclined wings, which maximized its speed and maneuverability while carrying mass of heavy ordnance. Unlike the other models in the TIE line, the bomber had not one but two central pods: a starboard cockpit for the pilot and a portside ordnance bay for the munitions. The cockpit featured two forward-mounted laser cannons, the standard transparisteel viewport, and an ejector seat in case a pilot on a distant bombing run needed to abandon ship.
The ordnance bay was divided into two sections. The forward ordnance bay carried either eight concussion missiles or four proton torpedoes. The main ordnance bay carried either four proton torpedoes and eight concussion missiles, or eight proton bombs and sixty-four thermal detonators, or six orbital mines, or even stormtroopers. Located underneath the ordnance pod was a bomb chute connected to the ship's targeting systems, a T-s7b targeting computer and a 398X bomb sight. The pod also featured a missile port that allowed for front-launching and torpedoes. The ordnance bay could also be swapped for a passenger cabin with room for six.
|


")

")
")