 Name: Tarkin (superweapon)
Type: Imperial Deep Space Mobile Battle Station "The Tarkin"
Manufacturer: Imperial Department of Military Research
Model: Tarkin battlestation
Class: Battlestation
Cost: Unknown
Scale: Death Star
Length: 42,000 meters
Height: 70,000 meters
Skill: Battle Station Piloting; The Tarkin
Crew: 35,705 (operational staff), 8,158 (gunners)
Passengers/Troops: 105,417
Cargo Capacity: 250,000 Tons
Consumables: 2 Years
Hyperdrive Multiplier: x4
Hyperdrive Backup: x20
Nav Computer: Yes
Space: 4
Hull: 5D
Shields: 6D
Sensors
Passive: 250/0D
Scan: 1000/1D
Search: 5000/2D+2
Focus: 40/4D
Weapons:
Ionic cannon superlaser (1)
Fire Arc: Front
Scale: Death Star
Skill: Capital Ship Gunnery; Superlaser
Fire Control: 1D
Space Range: 1-20/40/100
Damage: 2D-14D (can charge 2D per minute, however the vessels reactors can only supply 28D of damage without severely straining them.)
200 TurboLaser Batteries
Scale: StarFighter
Fire Arc: 50 Front, 50 Left, 50 Right, 50 Back
Fire Control: 1D
Space: 1-5/10/15
Damage: 5D
200 Heavy TurboLasers
Scale: Starfighter
Fire Arc: 50 Front, 50 Left, 50 Right, 50 Back
Fire Control: 1D
Space: 1-7/15/30
Damage: 7D
50 Laser Cannons
Scale: Capital
Fire Arc: 20 Front, 10 Left, 10 Right, 10 Back
Fire Control: 1D
Space: 1-5/15/30
Damage: 7D
60 Ion Cannons
Scale: Capital
Fire Arc: 10 Front, 15 Left, 15 Right, 20 Back
Fire Control: 1D
Space: 1-5/15/30
Damage: 4D
35 Tractor Beam Projectors
Scale: Capital
Fire Arc: 15 Front, 5 Left, 5 Right, 10 Back
Fire Control: 3D
Space: 1-5/50/100
Damage: 5D
Description: The Tarkin, or the Tarkin Project, was an Imperial superweapon modeled in principle after the first Death Star battlestation and named in honor of the late Grand Moff Wilhuff Tarkin. The Tarkin combined the first Death Star's offensive capabilities in the form of a planet-destroying ionic cannon superlaser with a defensive shield generator and a set of engines. Imperial engineer Bevel Lemelisk designed the Tarkin, at the behest of Emperor Palpatine following the Death Star's destruction at the Battle of Yavin, as a prototype weapons testbed for the construction of the Eclipse-class Super Star Destroyer, a massive warship armed with a ship-mounted superlaser. With technological refinements, the Tarkin improved upon the mistakes learned from the first Death Star, including the absence of the single design flaw-an exposed thermal exhaust port-that proved to be the original battlestation's undoing, in the name of the development of a second Death Star, built concurrently with the Tarkin.
The Empire secretly began constructing the Tarkin in the Patriim system, above the garrison planet Hockaleg, under the supervision of Admiral Nod Warfield. In 3 ABY, following the Battle of Hoth, Imperial Grand Admiral Martio Batch requisitioned the Tarkin's destructive superlaser to smash the planet Aeten II-the only ever offensive application of the Tarkin superweapon-releasing millions of the planet's deeply buried stygium crystals into space, which Batch gathered to recreate the stygium screen cloaking device for his TIE Phantom development project.
Once learning of the Tarkin's existence shortly thereafter, the Rebel Alliance dispatched an elite commando team consisting of Luke Skywalker, Princess Leia Organa, the Wookiee Chewbacca, and the droids C-3PO and R2-D2-the only Rebels to have been aboard the first Death Star and survived-to the Patriim system to infiltrate the Tarkin and destroy the superweapon from within before it could be completed. Despite the presence of the Dark Lord Darth Vader and a traitorous group of the superweapon's commanding officers, who sought to both kill Vader and stop the Rebel saboteurs, Organa drew upon a recollection of the original Death Star's technical schematics to rewire the Tarkin's superlaser firing mechanism to fire on itself. The Tarkin later self-destructed upon activation of the sabotaged superlaser in a failed attempt to obliterate the Rebels as they fled from the battlestation.
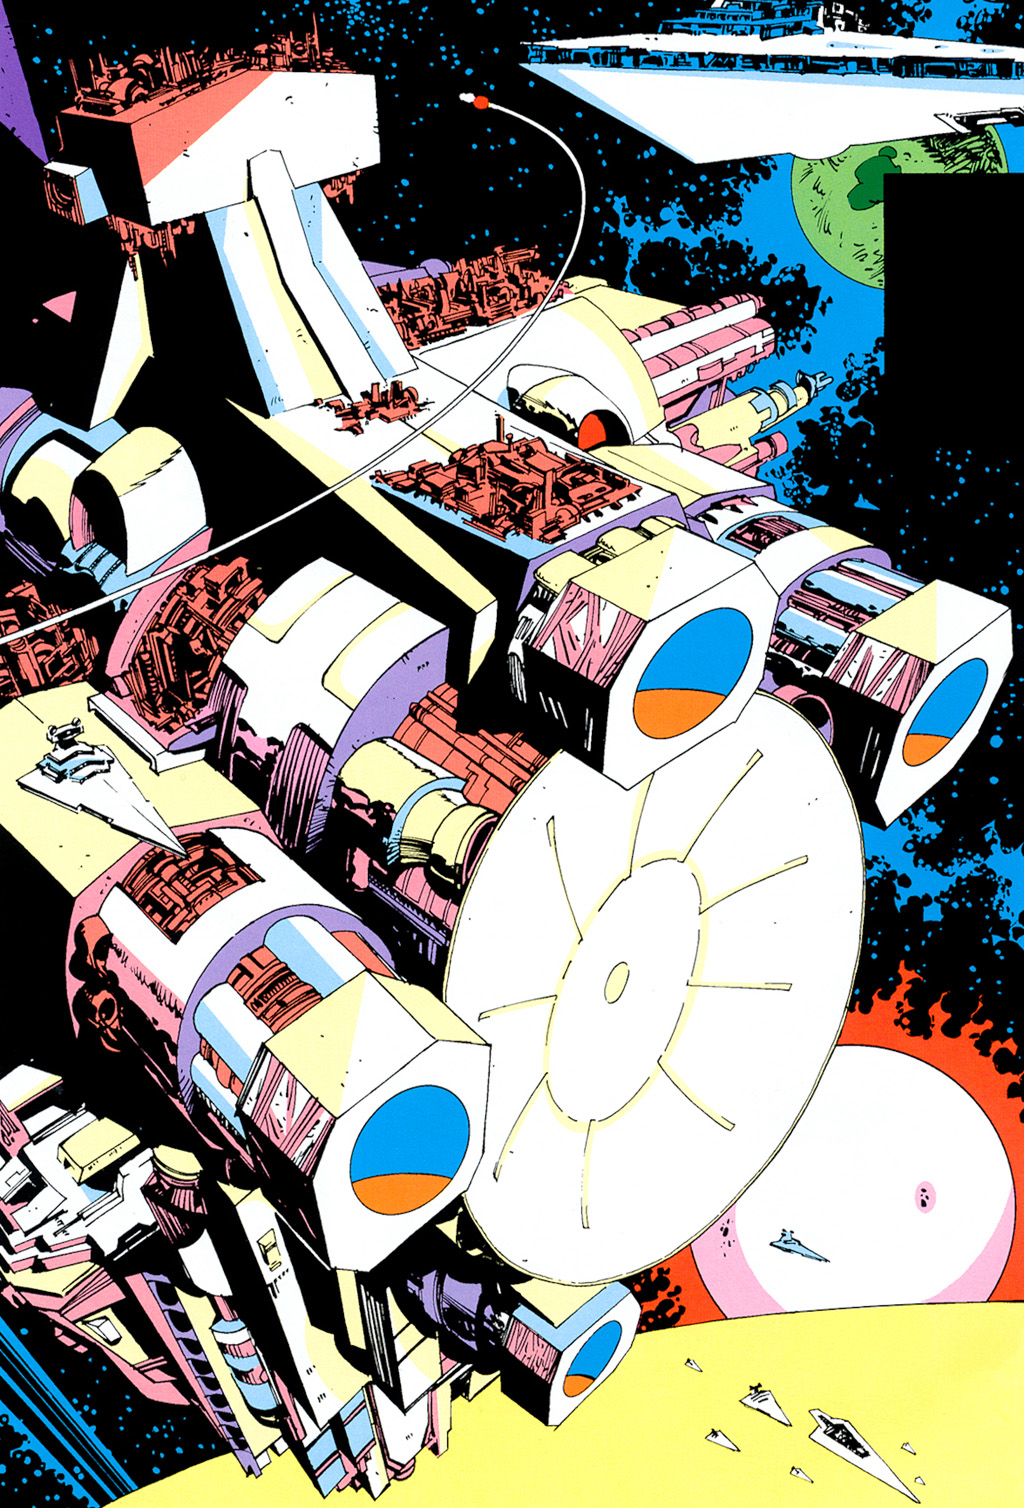
The Tarkin superweapon, also known as the Tarkin Project, was a giant planetary-scale battlestation following the same basic principles of the first Death Star. The Tarkin combined the Death Star's primary offensive battery and massive ionic cannon superlaser, capable of shattering a planet in the same mold as the Death Star's, with a defensive shield generator system and a set of engines. The Tarkin's superlaser, comprising a central concave dish encircled by a series of secondary tributary nodes, dominated the battlestation's external forward superstructure. The awesome size of the Tarkin reduced the Empire's normally-fearsome Star Destroyers to diminutives by comparison. Unlike its predecessor, the Tarkin was constructed without the single design flaw-an exposed thermal exhaust port-that led to the Death Star's destruction.
Set back from the forward superlaser dish was the Tarkin's central command tower and bridge. The command tower resembled the same trapezoidal design found on Imperial-class Star Destroyers, sans the twin deflector shield generator domes. The bridge, too, resembled the layout of the Imperial-class Star Destroyer in a general sense, with a wide angular viewport and a command walkway. A series of double-tiered seated command stations were circularly-arrayed before the bridge's viewports.
The battlestation's interior was divided into sections and levels identified by letters and numerals-K-level and sections TH-10 and TH-11, for example. The interior also housed the installation's main power reactor, the primary external tractor beam generator, the escape pod bay, hangar bays hosting the Tarkin's starship complement, and the superweapon's complex activating mechanism. A series of service lifts offered rapid vertical transport between the Tarkin's many decks.
A stormtrooper guard force patrolled the Tarkin and provided security for the battlestation's sensitive areas, restricting access only to those with proper clearance, and a series of gunners controlled the Tarkin's superlaser firing mechanism. The Tarkin also maintained a TIE/LN starfighter contingent for close-range aerial support. Non-military construction vehicles aboard the Tarkin included cargo vessels and cargo trolleys.
The Tarkin was a direct descendant, in both form and function, of the Empire's first Death Star, destroyed in the Battle of Yavin in 0 BBY. Incensed at the loss of his weapon of doom, Emperor Palpatine ordered engineer Bevel Lemelisk, the Death Star's original designer, to produce a resurrected Death Star, even larger and more powerful than the first. At the same time, the Emperor likewise had already ordered the construction of a pair of massive warships equipped with superlasers-the Eclipse-class dreadnought. To keep the Rebel Alliance from discovering the new Death Star and to test the ship-mounted superlaser of his new warships, the Emperor tasked Lemelisk with developing a prototype of the Eclipse-class into an operational weapons platform.
Lemelisk first set to designing a superlaser weapons testbed, similar in principle to the first Death Star prototype constructed in the Maw Installation, that corrected the mistakes learned from the first Death Star's design with technological refinements. Imperial officers eventually christened this weapons testbed, essentially a scaled-down version of the Death Star, the "Tarkin", in memory of the late Grand Moff Wilhuff Tarkin, the Death Star's former commanding officer.
After Lemelisk's design team completed their work on the Tarkin, they began designing the Death Star's successor. Meanwhile, construction on the superlaser testbed began at the Patriim shipyards in the Patriim system, above the garrison planet Hockaleg. The Empire secretly funneled resources into the Tarkin's construction under the nose of the Rebel Alliance. Although considerably smaller in size than the Death Star, the Tarkin was still so large as to be visible in the Hockaleg sky as a rectangular satellite. The construction was overseen by Admiral Nod Warfield.
As the Tarkin neared completion in 3 ABY, following the Battle of Hoth, the superlaser testbed became a symbol of intrigue for Grand Admiral Martio Batch. The Emperor had tasked Batch with developing a working cloaking device, since cloaking technology had become almost non-existent in the galaxy by the time of the Galactic Civil War. Batch succeeded only in creating a cloak that suffered from "double blindness," meaning that those aboard the cloaked starship could not see out. To create a fully functional cloak, Batch required access to the once-common stygium crystals found in the mines of the hidden planet Aeten II, but the mines had long since run dry. To solve the problem, Batch requisitioned the Tarkin's superlaser.
Batch pulled rank to divert the Tarkin to the Aeten system in the Dreighton Nebula of the Outer Rim Territories, where he used the superlaser to shatter Aeten II, thus releasing millions of the planet's remaining stygium crystals into free-floating space. Thanks to the Tarkin, Batch used the freed stygium crystals to recreate the classic stygium screen cloak in conjunction with his prototype TIE Phantom project. The destruction of Aeten II would prove to be the only time the Tarkin successfully fired its superlaser.
The Tarkin was constructed in the Patriim orbiting drydock facility above Hockaleg, held in temporary balance by the gravitational pull of the planet below. The Tarkin's sizable labor force resided in meager shanties in a spaceport town on the planet while in between work shifts, and construction crews were shuttled to the Tarkin daily. Several Imperial-class Star Destroyers protected the Tarkin drydock construction site.
Not long after the destruction of Aeten II, a Rebel pilot, Maraba Tev, led a spy mission to the Patriim system, where he stole a set of the Tarkin's schematics, revealing the battlestation's existence to the Rebel Alliance. Realizing the full destructive capabilities of the Tarkin and the incredible threat the battlestation posed, the Rebellion resolved to destroy the Tarkin before it became operational. Because the Tarkin was built without the single design flaw found in the first Death Star, a direct attack would have been suicidal. Instead, Rebel General Carlist Rieekan organized and dispatched a small commando team to infiltrate and bring the battlestation down from the inside. The Rebel assault squad included Luke Skywalker, Princess Leia Organa, the Wookiee Chewbacca, and the droids C-3PO and R2-D2-the only Rebels to have infiltrated the original Death Star and survived.
The Rebel commando team did successfully infiltrate the Tarkin, first by docking on Hockaleg aboard the freighter, the Millennium Falcon, listed as a vessel in need of repairs, and then mixing in among the Tarkin's construction crew and boarding a shuttlecraft that delivered them to the Tarkin in orbit. However, the Imperial superweapon would serve as a crossroads for three competing factions at the time of the Rebel infiltration. The Dark Lord Darth Vader, recently arrived aboard the battlestation for an inspection, detected Skywalker's presence as soon as he boarded. Vader ordered all on-board security to vacate the area housing the Tarkin's main power reactors, planning to confront Skywalker there and turn him to the dark side of the Force. Meanwhile, a group of the Tarkin's commanding officers, tired of living in fear of the Dark Lord's iron discipline, planned to kill Vader before the day was out.
The Rebels split up into three parties, each tasked with neutralizing a certain component of the Tarkin-Chewbacca planned to destroy the battlestation's exterior tractor beam generator to allow for an escape, Organa would secure an evacuation route by seizing control of an escape pod, while Skywalker would destroy the central reactor with a proton grenade-but not before alerting the Tarkin's bridge to their presence. Vader immediately moved to the sector of the Tarkin housing the reactors to intercept Skywalker, ordering the battlestation to increase security along possible escape routes, while the Tarkin's commanding officers, recognizing Vader's preoccupation with the Rebel infiltrator, prepared to strike.
Only one-third of the Rebels' sabotage strategy went as planned. Chewbacca, with the help of C-3PO, succeeded in blowing up the Tarkin's tractor beam generator after a conspicuous tangle with a trio of stormtroopers. Organa, however, was ambushed by four waiting stormtroopers in the Tarkin's escape pod bay. Although she quickly dispatched the group, Organa was forced to abandon the Rebels' planned escape route. Skywalker's mission was also foiled, not by Vader, but rather through the intervention of the Tarkin's commanding officers.
Vader was already waiting for Skywalker when the latter reached the reactor generator room, but before the two warriors could meet, Colonel Nord, one of the Tarkin's officers trying to kill Vader, remotely opened an airlock in the sector housing the reactor from the bridge, hoping to flush the Dark Lord out into space. The airlock breach nearly pulled both Vader and Skywalker to their deaths, and ripped the proton grenade out of Skywalker's hands into the depths of space, but both managed to resist the pull of vacuum. Skywalker pulled himself into an open freight lift and escaped the area, but the loss of the proton grenade meant he could not sabotage the Tarkin's reactor. Through his strength in the Force, Vader overcame the pull of vacuum to reach the manual controls and close the airlock, but he knew Nord had just tried to kill him.
Meanwhile, Organa, finding herself lost, had unwittingly stumbled into the activating mechanism for the Tarkin's central ionic cannon, which she realized was the very same machinery that had destroyed her homeworld of Alderaan. Knowing the Rebellion could never allow the Empire to use the Tarkin's superlaser, Organa bought her sabotage team a mode of insurance. She remembered the original schematics to the first Death Star that R2-D2 had once helped secure, enabling her to switch a few wires in the firing mechanism, which reversed the polarity modes of the superlaser's fire controls, in essence setting the Tarkin to self-destruct should it ever fire its primary weapon.
With their sabotage mission seemingly all but a failure, the Rebel team commandeered an unused transport and escaped from the Tarkin, but Vader ordered a pair of the battlestation's TIE Fighters after them in pursuit. The sudden arrival of Lando Calrissian in the Millennium Falcon helped the Rebels escape the TIEs, only to prompt Vader to enter the fray in pursuit of the Rebels in his own personal TIE fighter. The escaping Millennium Falcon managed to disable Vader's fighter but in doing so succeeded only in leaving both the Dark Lord and the fleeing Rebels in perfect firing sight of the Tarkin. Nord ordered the battlestation's ionic cannon primed, hoping to wipe out both Vader and the Rebels at once, but just as the Tarkin's superlaser completed primary ignition and the battlestation's gunners activated the firing mechanism, the Empire's superweapon testbed exploded.[4]
Leia Organa's tampering of the Tarkin's ionic cannon firing mechanism had set the superlaser to fire on itself. In a roundabout way, the Rebels' sabotage mission had been a success, and Organa single-handedly destroyed the same superweapon technology that had wiped out Alderaan. She and the Rebels escaped the Tarkin's destruction.
The Tarkin detonated in a massively expanding fireball of burning fuel in all directions that was clearly visible in the skies of Hockaleg. The explosion instantly swallowed two nearby Star Destroyers and a dozen more smaller vessels, and released billions of debris fragments, as well as electromagnetic radiation interference that prevented any local ship-to-ship communications. The explosion's shockwave sent Vader's fighter tumbling away into space, although the Dark Lord narrowly avoided his own destruction in the battlestation's wreckage and was soon rescued by a stormtrooper from the Hockaleg spaceport. Vader reasoned that the Emperor was possibly already aware of the Tarkin's destruction and would likely express his displeasure at the loss.
The loss of the Tarkin did not quell the threat of Imperial superlaser technology, however. The Empire unleashed the second Death Star only months later during the Battle of Endor, and although this Death Star would suffer the same fate as the Tarkin testbed-destroyed by the Rebellion-the battlestation's superlaser performed successfully during the battle. Years later, in 10 and 11 ABY, the resurrected clone Emperor Palpatine took the two Eclipse-class warships for which the Tarkin had served as a ship-mounted superlaser testbed-the Eclipse and the Eclipse II-as his personal flagships in a failed campaign to destroy the New Republic. Both vessels, like the Tarkin, were eventually destroyed. In 12 ABY, the Hutt crime lord Durga Besadii Tai commissioned Bevel Lemelisk to construct yet another Death Star-like superweapon, the Darksaber, which was similar in principle to the Tarkin, although it too met the same fate as its predecessors.
Commanders and crew
The Tarkin's core group of commanding officers included an alliance of men who had banded together to kill Darth Vader, the battlestation's commander-in-chief, in a plan originally formulated by Colonel Nord. They had grown tired of the Dark Lord's unforgiving nature and his tendency to kill their fellow officers for committing honest mistakes any Human would be prone to make. Unless they stopped Vader, they feared any one of them would be the next to meet one of Vader's dark-side executions. The group met within a secluded maintenance area near the bottom levels of the Tarkin to discuss their plan of action.
The group of Imperial officers included General Biel; Captain Voal, who originally carried out Vader's command to remove all security personnel from the Tarkin's reactor area in preparation for Luke Skywalker's capture; and Nord, the man responsible for the failed attempt on Vader's life. From the bridge, Nord remotely opened an airlock near the reactor area during the Rebel infiltration, hoping to flush Vader out into space, but the Dark Lord's Force powers allowed him to survive. Vader realized Nord's treachery, but the Tarkin exploded, killing the group of insurrectionists before Vader could deal with them.
Other officers serving aboard the Tarkin during the Rebel infiltration included an admiral stationed aboard the bridge. Vader commanded this admiral to ready his personal TIE fighter for launch to chase down Skywalker and the fleeing group of Rebels.
During the Rebel infiltration, the stormtrooper named Berl was among a trio of soldiers guarding the Tarkin's exterior tractor beam generator. Chewbacca physically lifted Berl from the ground and threw the stormtrooper into the heart of the generator, blowing it.
Additional stormtroopers patrolled Hockaleg's spaceport on the planet below, including troopers CT-4981, who left his post upon the Tarkin's destruction to search for survivors and recovered Vader; TK-813; and TK-529. CT-4981's duties included clearing shuttle flights to the Tarkin in orbit. Aside from enlisted military personnel, the Empire conscripted a number of Humans for ground operations at the spaceport. A sizable and motley construction crew of humanoids and other alien species-many of whom harbored disfavor for the Empire-also resided on the planet among the spaceport's spread of ramshackle structures while laboring on the Tarkin above. Each member of the construction crew wore green standardized uniforms. Skywalker and Leia Organa stole the uniforms of two construction crewmen, a laborer named Brunok and his partner, enabling them to intersperse among the construction crew and infiltrate the Tarkin. After witnessing the Tarkin explode in the skies above, many of the project's laborers revolted and ran amok of the Hockaleg spaceport, attacking the Imperial headquarters and the stormtroopers they encountered.
|


")
")
")