 Name: Sienar Fleet Systems TIE/rp Reaper Attack Lander
Type: Troop transport
Scale: Starfighter
Length: 24.2 meters
Width: 16.5 meters
Height/depth: 4.7 meters
Skill: Starfighter Piloting: TIE Reaper
Crew: 1
Crew Skill: Starfighter Piloting 5D, Starship Gunnery 5D, Starship Shields 4D, Astrogation 4D
Passengers: 10
Cargo Capacity: 3 metric tons
Consumables: 3 Days
Cost: 140,000 credits (new), 65,000 credits (used)
Hyperdrive Multiplier: x1
Hyperdrive Backup: na
Nav Computer: Yes
Maneuverability: 2D
Space: 7
Atmosphere: 350; 1050 kmh
Hull: 3D
Shields: 1D
Sensors:
Passive: 20/0D
Scan: 35/1D
Search: 70/2D
Focus: 3/2D+2
Weapons:
Laser cannons (2)
Fire Arc: Front
Skill: Starship Gunnery
Fire Control: 2D
Space Range: 1-3/12/25
Atmosphere Range: 100-300/1.2/2.5 km
Damage: 5D
Components:
Weapons: {replaces the above weapon}
Standard Sienar L-s1 Laser Cannon: A well balanced weapon with good range. {as above}
Sienar Ion Cannon: The default ion cannon is occasionally used on the TIE Reaper to emphasize its support role. In general however the default laser will actually kill targets and can help target AI opponents in fleet battles. {Damage: 4D Ion Damage}
Sienar Au-8 Guided Laser Cannon: Identical to the default cannon, but causes less damage and has auto-aim. The auto-aim on the cannon helps when tracking mobile targets like TIE Interceptors, but this upgrade is situational at best. {Fire Control: 3D, Damage: 4D}
Countermeasures: {Elite Pilots can choose to equip their fighter with two (left and right) Auxiliary systems}
Sienar XX-5 Seeker Warheads: Seeker Warheads, or sometimes called "flares", are the most common and flexible anti-missile countermeasure. TIE Reapers are slower and larger vessels, so more likely to be targeted by Missiles, and the Sensor Jammer is only a single use, so Seekers are a useful defence. {When used reduces enemy skill to attack the fighter with Missiles by 3D}
Chaff Particles: As a support vessel, TIE Reapers often use Chaff, as in order for it to reach maximum effectiveness, enemy missiles must fly through the static cloud. This cloud can be used to cover capital ships on occasion, allowing the Reaper to protect it's squadron or target. {When used creates a cloud behind the fighter which reduces all skill with missiles by 3D, but only for weapons fires through the cloud}
Sienar Sensor Jammer: The sensor jammer's short 4 second duration and single use make it not often used. Its biggest benefit is being able to shake missiles at any rate and from any direction. {A single use system, which stops any missile from hitting the fighter}
Auxiliary: {Depending on mission Elite Pilots may be allowed to equip their fighter with one of the below}
Sienar I-7 Ion Missile: Ion missiles are designed to be used against starfighters, and have half the lock-on time of concussion missiles. They cause minimal damage upon hits, but are strong against shielding. They inflict a stun on the target. Stunned targets continue on their previous trajectory and spin out of control, giving a pilot ample time to finish their opponent. They can be dumbfired and travel much faster than a torpedo, allowing a pilot to quickly hit-and-run capital ship shields or disable subsystems. {Skill: Starship Gunnery: Ion Missile, Fire Control: 3D, Space Range: 1/3/7, Atmospheric Range: 50-100/300/700m, Damage: 5D Ion Damage, Ammo: 4 missiles, Rate of Fire: 1}
Sienar Ion Torpedo: Ion torpedoes are much like proton torpedoes in that they are designed to be launched from standoff ranges against capital ships. Ion torpedoes are very dangerous - one can eliminate the shields of a frigate or corvette, and two can knock out the shields of the enemy capital ship. When used on the TIE Fighter, fly to the 1500 maximum range and cut your engines. Let your torpedo lock on, and then let it go. Use your agility to fly back home, or have a TIE Reaper resupply you with another, and go again. {Skill: Starship Gunnery: Ion Torpedo, Scale: Capital, Fire Control: 1D, Space Range: 1/3/7, Atmospheric Range: 50-100/300/700m, Damage: 3D Ion Damage, Ammo: 4 missiles, Rate of Fire: 1}
Sienar Targeting Beacons: Targeting Beacons auto-target and mark nearby enemies for 20 seconds. Marked enemies take extra damage, cannot use countermeasures to defend against missile attack, and will receive missile locks faster. {Skill: Starship Gunnery: Targeting Beacons, a successful hit attaches a targeting beacon to the target, adding +2D to the fire control and damage of all allied fighter attacking that target.}
Sienar Squadron Mask: The squadron mask temporarily provides stealth to the entire team, forcing the enemy team to rely on their eyes to track your movements. This only works for 2 rounds, with a 5 round cool down .{Increases the difficulty to detect the Reaper and its squadron by 3D}
Sienar Tactical Tractor Beam: The tractor beam is a lock on immobilizing tool. Catching an interceptor in your tractor beam allows you and your team to easily follow up and destroy the target. {Skill: Starship Gunnery: Tractor Beam, Fire Control: 3D, Space Range: 1/4/10, Atmospheric Range: 50-100/40/100m, Damage: 4D}
Sienar Tactical Shield: Lock onto a friendly and fire the tactical shield at them to grant them extra shield strength as their shields are energised and enhanced. The tactical shield is long ranged, allowing you to fire it from safety. {Skill: Starship Gunnery: Tactical Shield, Fire Control: 3D, Space Range: 1/4/10, Atmospheric Range: 50-100/40/1000m, Damage: +3D to targets Shields, loses 1D every 2 rounds as the energy depletes, requires a 4 round cool down before firing again}
Sienar Tactical Supply Droid: Lock onto a friendly and fire this at them to heal and resupply them. The Droid has a 5D repair skill and the target has all their ammunition replenished. {Skill: Starship Gunnery: Supply Droid, Fire Control: 1D, Space Range: 1/5/9, Atmospheric Range: 50-100/500/900m, Ammo 4}
Sienar Deployment Turret: Can be either dropped behind you and activated at any point. When it arrives at its destination, the turret mine will open fire with a small gun at surrounding enemies. {Fire Control: 4D (does not use pilots skill), Space Range: 1-2/10/20, Atmosphere Range: 100-200/1/2 km, Damage: 4D, Ammo: 4 mines, mine is dropped behind the fighter where it remains static, firing its blaster cannon at enemy fighters, has enough power for 5 rounds of operation}
Sienar Seeker Mine: Drops a mine behind you. The mine locks onto and chases any enemy that gets too close. Mines are most effective in narrow corridors where enemies will have to run near them.. {Skill: Starship Gunnery: Seeker Mine, Fire Control: 5D (does not use pilots skill), Space Range: 3, Atmospheric Range: 300m, Damage: 6D, Ammo: 5 mines, mine is dropped behind the fighter, where it follows for up to 1 minutes until another vessel enters it's range, upon which it attacks using only it's Fire Control}
Taim & Bak D9 Rocket Turret: Can be either dropped behind you and activated at any point. When it arrives at its destination, the turret mine will open fire with rockets at enemy targets, useful against enemy capital ships and subsystems. {Fire Control: 4D (does not use pilots skill), Space Range: 1/3/7, Atmosphere Range: 50-100/300/700m, Damage: 7D, Ammo: 4 missiles each in 3 Mines}
Hull: {One of the below may be selected for specific missions}
Sienar Ferroceramic Hull: The standard hull, with no strengths or weaknesses. {as above}
Sienar Agile Hull: Equip to receive a reduction in maximum health, but receiving improvements to manoeuvrability and acceleration. Fairly useful for brawling and turning fights, though the most powerful technique to use in turning fights is microboosts, not traditional turns. The light hull does not offer any benefits to maximum speed, so this part alone will not help you make hit and run attacks. {-1D to Hull, +2D to Manoeuvrability}
Sienar Reinforced Hull: Equipping this helps you absorb more damage to your hull, but reduces acceleration and manoeuvrability. To mitigate the mobility penalty, equip items that let you operate from a long distance, where only minute adjustments are necessary to shield allies. {+2D to Hull, -1D Manoeuvrability, -2 Speed}
Sienar Deflector Hull: The deflector hull places more emphasis on your shields rather than your health. For TIE Reapers, the Deflector hull can prove useful in combination with the Fortified Shield. {-1D Hull, +2D Shields}
Engines: {One of the below may be selected for specific missions}
Standard Ion Engine: The standard engine offers no benefits or drawbacks. Works reasonably well in all situations. {as above}
Twin Microthrust Engine: This engine decreases maximum speed and acceleration while increasing your manoeuvrability. This makes it decently good for brawling, but the true power of turning fights lies in understanding drifting, not traditional turns. {-1 Speed, +1D Manoeuvrability}
Twin Propulsion Engine: This engine increases acceleration, allowing you to change speeds much faster than normal. This comes at a slight loss to manoeuvrability. This engine does not increase your maximum speed, only the rate at which you change speed. {+1 Speed, -1D Manoeuvrability}
Twin SLAM Engine: The SLAM (Sublight Acceleration Motor) engine automatically produces boost power regardless of whether there is maximum power in the engines or not, at the cost of maximum speed. It is similar to the Jet Engine, in that it provides smaller boosting power but lets you boost more often. The SLAM engine reduces your overall speed, but lets you divert power from engines to other systems and receive a small trickle of boost power. Increasing power to engines will appropriately increase the boost meter respectively. {This diverts power to the other systems of the Reaper, +1D damage to the Energy Weapons or Shields, at the expense of -2 Speed and -1D Manoeuvrability}
Shields: {One of the below may be selected for specific missions}
Standard Sienar Deflector Shield: This shield offers no benefits or drawbacks. {as above}
Sienar Resonant Shield: Reduces your maximum shield capacity, but overcharges your lasers automatically when your shields are maxed out. The shield also does not decay when you switch power away from them. Using this shield lets you freely charge boost power, and when combined with the SLAM engine, vastly simplifies power management at the cost of performance. {The pilot may divert power from Shields to Weapons, dropping Shields by 1D, but increasing Energy Weapon damage by 1D)
Sienar Scrambler Shield: An alternative to the Dampener Hull, the scrambler shield offers even longer lock times than the dampener hull {-2D to enemy Fire Control for Missiles}
Sienar Fortified Deflector:The Fortified Shield offers a bonus to shield capacity at the cost of shield regeneration. This shield is best used when taking heavy fire to attack a capital ship.{adds +1D to shields, however when the fighter takes any damage at all, this bonus is lost}
Description: The TIE reaper is a support starfighter with advanced utility, meant to aid their squadron by empowering allies, disrupting enemy starfighters, and protecting the Empire.
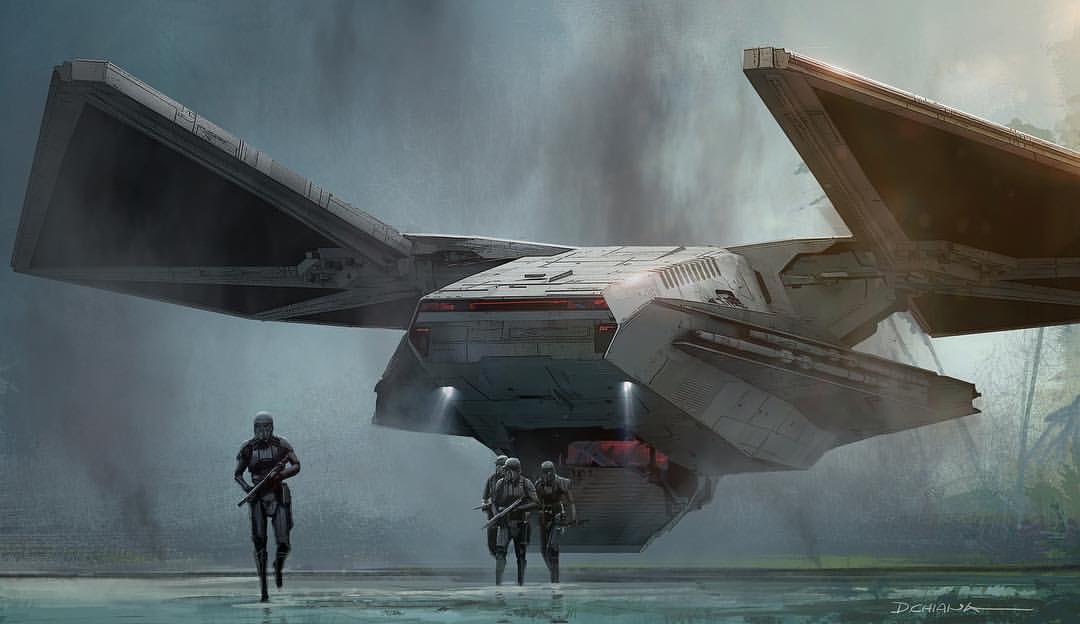
The TIE/rp Reaper attack lander, also known simply as the TIE Reaper, was a troop carrier variant of Sienar Fleet Systems's TIE line used by the Galactic Empire. The TIE Reaper differed from the standard craft of the TIE line as it was primarily a troop dropship; designed for ferrying troops amidst the heat of battle, such as the death troopers on Scarif in the outbreak of the Galactic Civil War.
Support craft have a number of auxiliary systems dedicated to helping their team and hindering their opponents. While poor dogfighters and should never be in the middle of a furball, supports are often bullied by other players due to their value. They have a few anti-fighter auxiliary options, but lack the mobility of fighters and interceptors and the raw damage of bombers.
As a support, you will also be responsible for coordinating the rest of your team. You will be the furthest back from the action, and have the widest view of the battle. Communicate with your team and tell them about the stealthed X-wing going for a torpedo run on your capital ships.
Support Reapers will usually use the Tactical Shield, which allows Imperial fighters to receive the partial benefit of shields from a safe distance. TIE Reapers are very fragile with large hitboxes, making them easy pickings for fighters when isolated. The hitbox of the Reaper is smallest from the sides and largest from above and below, so avoid exposing your dorsal or ventral surfaces.
|


")